Saturday, December 31, 2011

And in the morning, I'm making Waffles!

Brittney's Nanny bought us a waffle iron for Christmas, which was a really great gift, because I love to bake, and Brittney loves waffles, so she gets more bang for her buck. But before we get into the discussion about waffles I have a little history lesson for you.  By the way, the title is Donkey from Shrek (in case you didn't know).     It might be hard to tell from the picture, but that is a Black & Decker waffle iron, so Nanny really scored big because she got me a power tool to cook with.  But here's the history lesson (or my interpretation, rather).  Black & Decker used to make some awesome power tools.  If you find something from this manufacturer that just says Black & Decker without the little logo and it looks really old, it's probably a great tool.  However, they took a turn for the worst and started making complete crap somewhere along the way.  Don't get me wrong, for the typical homeowner who uses a cordless drill to hang a picture frame once a year they are great, and affordable.  But for those of us who make a living with our power tools we need something a little more heavy duty.  So Black & Decker finally admitted to themselves that they totally suck, and no contractor is going to buy their tools anymore so they made up a new brand name and started selling the same old quality, just painted yellow.  They introduced DeWALT to the world!  And we love DeWALT.  They don't break when you drop them from a 8' tall ladder, I know, I did it just yesterday, literally. So contractors love DeWALT. The only crappy thing is I don't think they are American made, so if you're into buying American you'll want to stick with craftsman or porter cable.
History lesson is over!

I chose not to break out the yellow spray paint, but I felt the need to at least go with a name change.  With that out of the way I could finally begin making waffles.  I won't bore you with the details....they're waffles for crying out loud, but here are some pictures of my results, and as always, UGLY!

1st Waffle Ever on my new waffle iron.


Second waffle, getting better.
So they all pretty much sucked today, but I think I figured out what to do...ignore the freakin instructions and follow my instincts.  They will be better next time.

Friday, December 30, 2011

Just Read It, do I really have to come up with a clever, catchy title every stinkin time?????


So those of you who follow my blog religiously, all 8 of you (not really even 8 cuz I know my wife has at least three accounts and all are following me, but whatever), I thought you might be interested to know I made cake balls a couple weeks ago.  I have some pictures....


Batter


Ok, so they're not balls, they're cubes.


And that's all I have to say about that!


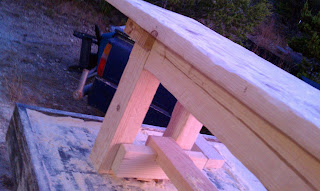
Ok, maybe I have a few more things to say.  First, they are freaking amazing.  I'm not going to bore you with the recipe because you can find it anywhere, and frankly I don't even remember.  Mine were far from beautiful.....duh, this is the ugly cheesecake!  I don't do pretty.  Not to say I don't try sometimes, it just never works.  That's why I love the word rustic....take this bench for example.


Last year for Christmas my wife asked for a dining table.  So I ask her what she wants...and she shows me a picture of a table on restoration hardware's website of a "rustic" table made from reclaimed 100-yr old pine.  So I thought to myself, if they can take some crap that's 100 years old and make it look like that, why can't I take some lumber that's brand new and do the same thing.  So I made her a table, then while I was at it, I made this bench too.  Now she has a dining table that is roughly 8' long and almost 4' wide with a bench to match.  It's rustic....and restoration hardware was charging way more than a grand for their version...granted if you calculated my time, that's about what this one cost me.  However, last winter, time was something I had a lot of...not so much money though. So here is an example where ugly is beautiful. 

Monday, December 26, 2011

Thin Mints without having to kidnap a Girl Scout

So I came home from work the other day and my wife had captured a girl scout.  It was the strangest thing; completely out of character for my wife to be kidnapping poor innocent little children.  I mean, I know she wants lots of kids, but I never thought she would go through such lengths to get one.  So I had to ask, "what the hell are you thinking?"
To which she replied, "She's gonna give me some thin mints if she ever wants to see her parents again!"
"Oh crap," I thought, "She must be pregnant again, she's having cravings..."
Then she started tickling the poor little girl wildly demanding the cookies.  In an effort to save the poor child I dashed into the kitchen and went to work and recreated the cookie perfectly enough to win the little girls freedom.

Ok so I'm full of crap, she actually stumbled across an amazing recipe on pinterest.  I was a bit suspect because of its ease, but on Christmas Eve, I was willing to cheat a bit...and I'm sure glad I did.  Nowhere in my reading did I see anything about it tasting like a thin mint cookie, but it does.  The only difference is this is a soft, chewy, wonderfully amazing cookie, instead of a crunchy wafer.  So I decided to share with you all.


Here's the recipe:
1 Chocolate Box Cake Mix
2 Eggs
1/2 Cup oil
1 Package Andes Mints
Pinch of salt.


Preheat oven to 350.  Combine first 3 ingredients. Roll into balls the size of a large marble.  (optional step: sprinkle about 5 grains of salt on top of each ball...really makes 'em taste more like a thin mint.) Bake for 6-9 minutes (I did 9 minutes).  While they are baking unwrap the Andes mints.  As soon as you pull the cookies from the oven put one mint on top of each cookie.  Let the mint melt real good then smear it around with a spoon. Done!


Thursday, December 15, 2011

Stolen from Rockler Blog


I totally ripped this off from Rockler's blog, but it sounds like something I would totally do if I didn't have a kitchenaid mixer alread!


A Router Technique We Can't Endorse


This tale of router "technique" turned culinary disaster appeared a few years ago onrec.woodworking and later found its way to the Woodworker's Journal eZine Web Surfers' Review.   We think the story is so well and vividly told that it deserves to be posted again.
"This afternoon I was foolishly left alone in the kitchen with a seemingly simple task: whip some cream.
It all started when I was attempting to whip some whipping cream into, oddly enough, whipped cream with a hand whisk, and it seemed to require far too much effort on my part. I am sure a Neanderthal would be quite happy with a hand whisk, but I was looking for a Normite way to get this done. Now I realize that most people have a power hand mixer, or what ever they are called, but I don't have one.
I started thinking, how much different could one of those things be from a router? All a hand mixer consists of is a motor with a Jacobs chuck- like socket for whisks. Now if you think you know where I am going with this, you are probably correct. I got out the dial calipers and the shaft of the hand whisk was exactly 1/4". Woo Whoo!my first problem was solved. I could use the standard 1/2" to 1/4" bushing. I go out to the shop and take my 3 1/4 HP Hitachi M12V out of the router table and go back into the kitchen. Using my 21mm and custom ground thin 23mm Craftsman wrenches, I chuck up the whisk. Next problem: speed. I measured the diameter of the business end of the whisk and consulted my router bit speed chart. It said I should use 18,000 RPM. The only question left was technique, clockwise or counter clockwise.
Since I was doing an inside cut, I decided to use the standard counter clockwise. I fired up the big green monster. Good thing the M12V has a soft start feature, because even with my elbows braced on the countertop, this is a heavy and unwieldy router to freehand in the air. Even then the torque was still more than I was prepared for and I almost lost it. OK, here we are, full power. There was a quick blur of chaotic white liquid filling the air, and as the blur subsided I quickly realized the bowl that previously held two cups of whipping cream was now virtually devoid of cream. I powered down the router. My face, glasses and upper body were covered in cream, as was two thirds of the kitchen. My better half, alerted by the unusual tool noise and loud cursing coming from the kitchen, walks in to ask just what the hell I thought I was doing. I wipe off, change clothes and come back to explain myself and clean up a very large mess.
Once I explained what I was attempting to the young lady, I thought she was about to become my ex-wife. She was standing in front of me with a look of such total disbelief. I was told that 18,000 rpm was a little too high for a whisk, and that a variable speed cordless drill would have been the correct choice of tool for this task. We were out of whipping cream at this point, so I will have to wait until after I have a chance to go to the store tomorrow to find out if the cordless drill works any better. Now that I think about it, it would seem like the drill press is the way to go."
We can't say for certain whether any of the routers that Rockler offers have been "kitchen tested" and found suitable for the operation described above. But we can say, without fear of contradiction, that Rockler offers one of the best and most complete selections of routersrouter bits androuter accessories that you'll find anywhere.

Wednesday, December 7, 2011

Potato Candy

Yes, you read that right, Potato Candy!  It all started when.......

My wife was telling me we need to start using the potatoes she bought, so I searched the web for potato recipes and found that people actually make candy with potatoes.  Obviously my curiosity got the best of me so I had to try.

Quick note here, I recently read some of my past posts and realized I am way too long-winded!  Who really wants to read a 3 page essay on how and why I made my latest dessert????  So I am going to try to keep it short this time.  I took lots of pictures since most of us have never heard of potato candy before.


 Just need one spud, a bag of powder sugar and a tub of peanut butter.


Peel and slice the potato, then boil it till it's soft.


Once the potato is soft, drain the water and beat it with a mixer, like you're making mashed potatoes the lazy way.  When the potatoes are good and mushy, add half of the bag of powder sugar and continue to beat. You're probably gonna be thinking this looks a lot like snot, and you're right. At this point add a tablespoon of vanilla extract.


Add in the rest of the powder sugar and it will thicken up a bit.  It still looks too thin to be able to work with a rolling pin, but something magical happens when you take it out of the bowl and it actually rolls out alright.


Lightly dust the countertop, or some wax paper and plop half of the stuff on top.  Dust the batter(?) ish thing with more powder sugar so it doesn't stick to the rolling pin, then roll it out about 1/4 thick.


Smear on some peanut butter.


Then roll it up like a cinnamon roll.  I had to use a scraper to break it free from the counter top.  
And slice it.


 Then for fun, with the remaining half, I added about a shot ( a Brady sized shot) of bourbon to give it some added flavor.


 Then smeared it with nutella instead of peanut butter.


Then went outside and played with my beautiful baby girl while the candy set in the refrigerator for a while.


from bigspud.com

Tuesday, December 6, 2011

Key Lime Pie Cheesecak

Yeah, I know, it looks like almost every other cheesecake I've ever made.  Its yellow-ish, has a huge flux-capacitor-shaped-crack in the middle, and it is slightly sunken in the middle.  But ya know what is different about it?  It's a freakin key lime pie stuffed inside a cheesecake, metaphorically speaking!  


This was quite a difficult process.  Try and stay with me here and I will describe exactly how I made it. I started out with 12 graham crackers and beat the ever livin crap outta them!  Once they submitted and became little bitty crumbs at the bottom of the jar(right now my sister is saying "eat 'em up eat 'em up, chomp chomp chomp), I combined them with 2Tbsp of sugar and 1tsp salt then mixed in a stick of butter.  That's right a full stick, this is baking Paula Deen style.  That gets all squished into the bottom of the springform pan to make the crust.  Next comes the cheesecake part.  3-2-1 If you've read my blog you know what that is, if not click the link to see my recipe, it's so easy you'll want to make one yourself tonight, but then you will read the part about it having to refrigerate for several hours and you will change your mind and decide to have some ice cream instead.  You know, they say ice cream sales are always up when it's the coldest. 

To turn my original 3-2-1 recipe into a key lime pie cheesecake it requires key limes.  Duh!  I decided I would need to squeeze some juice into the batter to give it a good lime flavor, and then figured some zest would really kick it up a notch. 
I squeezed and squeezed until I got 4-5 Tbsp of juice and dumped it in.  Then I set out to start zesting.  My plan was to add about 4 Tbsp of zest......do you know how many freakin limes you have to zest to get that much???????  Yeah, me neither!!!!!!!!   I gave up after about 5.  My hand hurt like it hasn't hurt since I was in school having to write...you remember, before we all had laptops!  

The zest got added to the batter and mixed in well.  
I could make up some great reason like "I really wanted to balance the graham cracker crust well with the creamy cheesecake, so I only put a thin layer"  but I really don't know why I chose to do it that way.  I have no good explanation, hell I'm doing good to remember why I turned on my computer 15 minutes ago, I baked that cheesecake 5 days ago.  Who knows why I only put that small amount, but I'm glad I did.  It worked out perfectly.  The crust is super thick and the cheesecake equally thin which really does create a nice balance and the lime flavor really shines through.  It is an amazing cheesecake.  My wife had all her "mommy" friends over tonight and served this, they all totally loved it.  And I had 2 slices tonight, which is a big deal because I rarely even eat a whole slice.  I usually eat enough to determine how I like it and what I need to fix.


Sunday, December 4, 2011

Chocolate Covered Cookie Dough Bites

 Does that not sound like the greatest thing ever to be dipped in chocolate????????
Unfortunately I cannot take full credit for the idea.  My wife and I were out Christmas shopping at Target and I was browsing the candy aisle because I am really just a giant sugar craving child on the inside and there it was, on the top shelf, the chocolate covered cookie dough truffles.  I am not totally sure what they had done to create these, but I knew exactly what I was gonna do to rip off their idea.


Once I got home and helped unload all the crap we bought I decided to give it a try.
For my dough, I decided to use the recipe off the back of the Crisco tub and just leave out the eggs.  I substituted about 3 Tbsp of applesauce instead. I melted some chocolate in my double boiler then dipped the balls.  And they were freakin awesome.

Definitely need some milk to go with them.


Next time I think I will try some mint in the chocolate and see how that goes....I know, I'm a rebel.  Enjoy!